Importing and Calibrating CT or MR Images

Open Plaque Simulator's Image window

If the Image window is not visible, bring it to the front by selecting the Images item from the Window menu.

WindowImages

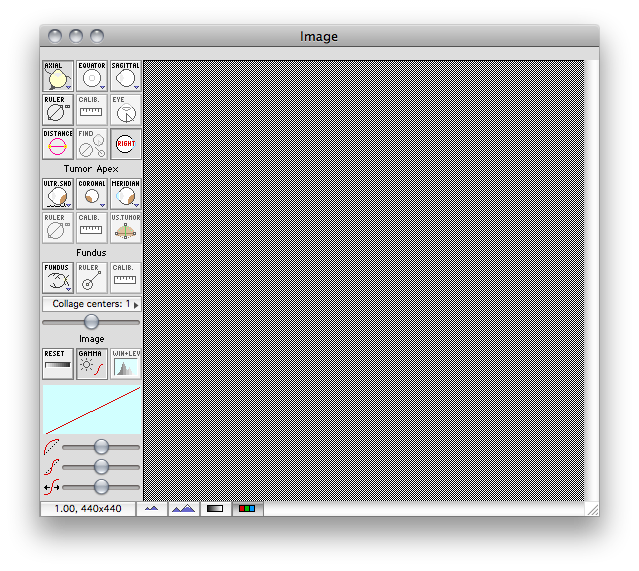
In the Image window, click on the Axial button in the upper left corner of the window. If the axial image buffer is currently empty, PS will prompt you to open an image. If there is already an axial image loaded, PS will simply display that image in the window. To clear the currently displayed image, use the Clear item of the Edit menu.

ImageWindowAtStartup

Opening an image file

The recommended method of preparing CT and MR reconstructions for Plaque Simulator is to use the OsiriX program to create the images and export them as .jpg files.

If the file navigation dialog does not automatically appear when you click the Axial button, select Open File... from the File menu. The file navigation dialogs of PS are context sensitive; the types of files that are enabled for opening depend upon which PS window was frontmost when attempting to open a file. If the Image window was not frontmost when you selected Open File..., you may need to override the default context and select Image File from the File type: menu at the lower left of the file navigation dialog in order to enable access to image files.

FileOpenFile
NavigationOpenImage

Navigate to the patient folder (e.g. OsiriX Tutorial) in which you have saved the prepared images and select an image (e.g. Axial). Click the Choose button to continue.


Using the ruler tool

After the axial CT image file has loaded, click the Ruler button in the CT buttons group to display the PS calibration ruler tool.

ImageWndwCTGroupRuler
  • The PS ruler tool is a magenta circle with two diametrically opposed yellow sizing control points (aka handles).
  • Click the cursor most anywhere on the tool and drag it over the image's calibration ruler, green lines in this example.
  • Adjust the diameter of the circle to 50 mm (typically) on the image by dragging the yellow handles of the tool over the tic marks of the image's ruler.
  • The diameter distance readout on the tool will indicate pixels until the image is calibrated.
CalibrateCTEnableRuler

Calibrating the image

Next, click the Calib button adjacent to the Ruler button to open the Calibrate Image dialog.

ImageWndwCTGroupRuler
  • Enter the physical diameter of the circle in mm (ie 50mm in this example) and then exit the dialog by clicking the OK button.
  • The CT image has now been calibrated (PS now knows the physical dimensions of an image pixel) and the ruler tool will display its diameter in mm instead of pixels.
  • If several images have the same calibration factor (e.g. all exported from OsiriX using the same window size and magnification) you can open those images in PS and then just calibrate one image and copy the calibration to the other images.
CalibrateAxialImageDialog


Measure Eye Size Tutorial | Advanced Tutorial | Eye Size Dialog | Guide Contents