The Image Window

Image window

There is no way for the software to determine what kind of image it is opening other than having the user provide that information. The Axial, Coronal, Sagittal, Tumor-coronal, Tumor-meridian, Ultrasound and Fundus buttons are linked to offscreen image buffers that have been prepared for each type of image. You can open any kind of image into any of the image buffers without damaging the program, but the results from a treatment planning perspective will be undefined. To load an axial CT image, click the Axial button. If the image buffer is empty, PS will prompt you to open an image. If an image already exists in that buffer, PS will simply display it. To replace an existing image, click the appropriate image type button and then use the File menu to open another image.

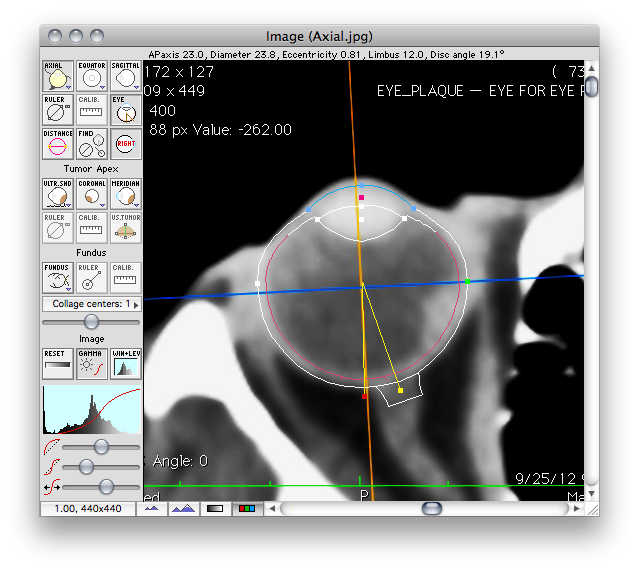
In the Image window the first task is to open a set of 3 orthogonal CT or MR scans of the eye. These images are used to measure the diameter of the eye at the equator, to determine the distance between the posterior pole and the center of the optic disc, and to estimate the ellipsoidal curvature of the anterior hemisphere. Next, CT or MR images for a meridian plane and a coronal plane that intersect the tumor apex are opened. These images can assist in determining the location within the eye of tumors that are too anterior to be photograhed by the fundus camera. Planar isodose calculations can also be overlayed on these images. Next, an ultrasound image is opened to document tumor height and dome shape. Lastly, a collage of fundus photos is opened. The fundus collage is used to digitize the perimeter of the tumor base at the retina. Quicktime compatible images (JPG, PNG, TIFF, GIF, etc...) require a manual calibration procedure to determine the ocular dimensions represented by an image pixel. DICOM images are self-calibrating. The recommended software for preparing and exporting the images that PS requires is the OsiriX program.

Try to keep all images under 800x800 pixels, there really is nothing to be gained by larger images, and the file size of .pdf documents becomes too large to send by email. A copy of each image is stored in uncompressed format in the PS .iplan patient file, so file size can become very large if the images are large. Images can be magnified using the "zoom" buttons at the lower left of the window, and you can pan using the scroll bar controls or by holding down the command key and "dragging".


CT Controls Group
ImageControlsCT
  • Axial - Displays the axial image. If the image is empty, the file navigation dialog will open.
  • Equator - Displays the equatorial image. If the image is empty, the file navigation dialog will open.
  • Sagittal - Displays the sagittal image. If the image is empty, the file navigation dialog will open.
  • Ruler - Enables display of the calibration ruler tool. Adjust the diameter of the circle to a known distance in the image such as 50 mm.
  • Calib. - Opens the image calibration dialog in which is entered the diameter of the ruler tool in mm.
  • Eye - Enables display of the eye sizing tool.
  • Distance - Modifies the ruler tool to display additional distance and anglular measurements.
  • Find - Brings offscreen tools back into view.
  • Left (or Right) - Select between modeling a left or right eye.

Tumor Apex Controls Group
ImageControlsTumorApex
  • Ultrasound - Displays the ultrasound image. If the image is empty, the file navigation dialog will open.
  • Coronal - Displays the coronal image that intersects the tumor apex. If the image is empty, the file navigation dialog will open. Use OSIRIX to create thi image.
  • Meridian - Displays the meridian image that intersects the tumor apex. If the image is empty, the file navigation dialog will open. Use OSIRIX to create this image.
  • Ruler - Enables display of the ultrasound calibration ruler tool. Adjust the diameter of the circle to a known distance in the image such as 50 mm.
  • Calib. - Opens the image calibration dialog in which is entered the diameter of the ruler tool in mm.
  • US.Tumor - Displays the tumor sizing tool.

Fundus Collage Controls Group
ImageControlsFundus
  • Fundus - Displays the fundus collage image. If the image is empty, the file navigation dialog will open.
  • Ruler - Enables display of the fundus calibration tool. Place the labeled end of the tool over the posterior pole, the other end over the center of the optic disc.
  • Calib. - Opens the fundus calibration dialog in which is entered the distance between the disc and pole in mm. This distance is automatically calculated by the eye sizing tool.
  • Collage centers - Select the number of pictures that were stitched together to make the collage.
  • Collage slider - Adjust the diameter of the collage pictures.

Fundus Collage Controls Group

Image Enhancement Controls Group

ImageControlsImage
  • Reset - .
  • Gamma - .
  • Window & Level - .
  • Bias (or Brightness) slider - .
  • Gain (or Contrast) slider - .
  • Level slider - .

Footer Buttons
ImageControlsZoom
  • Window size - Opens the Window Size Dialog dialog.
  • Zoom out - .
  • Zoom in - .
  • Monochrome - .
  • Color - .

These links detail the file and calibration procedures for CT & MR images, fundus images and ultrasound images.


Eye Size Dialog | Guide Contents