The Setup menu of the Patient Setup window provides additional control over plaque location and orientation on the eye.
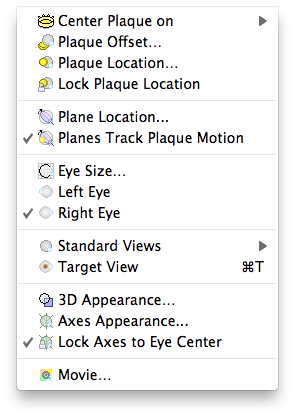
- Center Plaque on - use this hierarchical menu to center of the plaque over the selected location.
- Plaque Offset... - opens a window that allows you to rotate and tilt the plaque orientation with respect to the eye. This might be used if one edge of a plaque is sitting on a muscle or the cornea.
- Plaque Location... - opens a window to precisely position and orient a plaque.
- Lock Plaque Location - locking the plaque location prevents the plaque from being accidentally moved by clicking on it in the setup or retina windows. You should lock the plaque as soon as you are satisfied with the location and orientation.
- Plane Location... - opens a window to precisely position and orient the meridian and coronal dosimetry planes.
- Planes Track Plaque Motion - when checked, the meridian and coronal dosimetry planes will automatically adjust to pass through the center of the plaque as it moves on the eye.
- Eye Size... - Opens the eye size dialog.
- Left Eye - Change model to left eye.
- Right Eye - Change model to right eye.
- Standard Views - use this hierarchical menu to rotate the eye to the selected view.
- Target View - rotate the eye to look at the tumor base.
- 3D Appearance... - Open the Setup Appearance window.
- Axes Appearance... - Open the Axes Appearance window.
- Lock Axes to Eye Center - Keep the axes at the center of the eye even if the center of rotation moves.
- Movie... - Open the Quicktime movie making dialog.