These are the dose calculation parameter button settings for an Eye Physics plaque.
- PS Calculation enabled (vs the obsolete COMS protocol).
- Linear source mode enabled (vs point source).
- Anisotropy corrections enabled.
- Silicone carrier corrections disabled (Eye Physics plaques have no carrier).
- Gold flourescence corrections enabled.
- Air scatter corrections disabled.
- Shell collimation disabled (redundant for a slotted plaque).
- Slot collimation enabled.
The plaque is loaded with seeds so as to deliver 85Gy to the apex of a 4.5 mm tall equatorial tumor (note that tumor height is measured from the inner sclera) in 7 days (168 hours). The Rx units have been set to Gy.
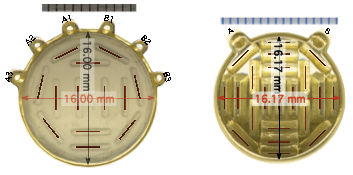
The axial dose table in this window provides a quick way to compare plaque options. For example, the concave faces of the models EP821 and COMS16 plaques have almost identical diameters (16.0 vs 16.17 mm). The COMS16 plaque holds 13 seeds whereas the EP1821 holds up to 21 seeds and so can use a greater number of lower intensity seeds to deliver the same Rx point dose. The seeds of the thinner EP1821 are slightly closer to the sclera but are individually collimated. The result is that for a Rx of 85 Gy at 4.5 mm above the inner sclera, the EP1821 delivers 113 fewer Gy to the inner sclera directly over its center compared to the COMS16 (133 vs 246 Gy) at a "cost" of only about 0.5 Gy greater dose at 15 mm (16.3 vs 15.8 Gy).
Note 1: tumor height is measured from the inner sclera, so the apex of a 4.5 mm tumor falls midway between 5 and 6 mm in this table because it currently considers 0 elevation to be at the external sclera! You may optionally change the table such that 0 elevation references the inner sclera if you wish. The dashed blue line indicates where the Rx dose falls in the table.
Note 2: in this example, a change from standard time to daylight saving time occurs on Sunday March 14th, which happens to fall within the prescribed 168 hour implant. The removal time was automatically adjusted to 11 AM (for an implant time of 10 AM) to account for this clock change.