
GETTING STARTED
- You can download the Madena installer from the USC Radiation Oncology web server to your PowerMac hard drive. Part 1 is the application and some sample images. Part 2 is a copy of this on-line user guide. (Please be aware that the downloadable user guide will lag behind the web hosted version, so please use the online version whenever possible.)
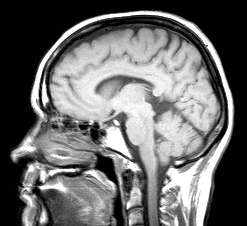 Digitize images using a digital camera or flatbed scanner or a film scanner in 8 bit grayscale mode at a resolution between 72 and 200 dpi. Higher resolutions are permissible if sufficient RAM and hard disk space are available. Save as either PICT, TIFF, GIF or JPEG file format. Do not compress JPEG images very much! (Use maximum quality). Basically, any Quicktime supported file format can be used. Note: Madena internally converts all images, including color images, to 16-bit densities when they are opened. A "window and level" function optimizes viewing of the 16-bit data in 8-bit (256 levels of gray) display and analysis space. The original color image can also be retained and displayed.
- The current version of Madena can also open most industry standard 8-bit and 16-bit DICOM 3 files obtained from almost any source and operating system including UNIX and Microsoft. Currently supported DICOM formats include single and multiple frame files, MONOCHROME1, MONOCHROME2, RGB, HSV, PALETTE_COLOR, YBR_FULL, RLE compressed images, and some JPEG encapsulated (baseline encoding only) files. Madena also supports ANALYZE 7.5 and 16-bit TIFF files.
- Put your Mac in 24-bit color (millions of colors) display mode. You can use either the control strip pop-up in MacOS 9 or the "Displays" control panel in Mac OS-X System Preferences to do this. Even though personal computers like Macs and PCs are capable of "millions of colors", they can only display 256 levels of gray! Shades of gray (densities) are created by setting all three RGB channels (one byte each for red, green and blue) of each pixel equal to the 8-bit gray level. Tinting is accomplished by reducing one or more of the color channels relative to the others. For example, a yellow tint is created by reducing the "blue" channel (eg. setting the "blue" byte corresponding to a particular pixel to zero) while leaving the red and green channels equal to the original gray level. (Note: when counting pixels, Madena considers a pixel to be "tinted" if its R, G and B components are not all precisely equal to one another. Very dark colors whose RGB component bytes all round to 0 during tinting will be displayed as "black" and therefore considered as "not" tinted.)
- Set the monitor display resolution at 832 x 624 or greater. Greater is better.
- Open the Madena program by double clicking on the Madena icon. For best performance, no other programs should be running at the time you open Madenna.
- Under the File menu at the top of the screen select "Open". In the dialog box that appears choose file type "Picture" or one of the 16-bit importers (DICOM or TIFF) from the pop-up file type menu. Then find and select the file name of the image you wish to analyze (the image might be on a CD obtained from your radiology center or it might be an image that you scanned as in step 2 above.)

-
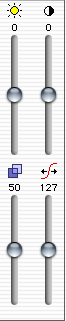 The magnification of an image can be changed by clicking on the icons in the lower left corner of a window. The appearance of an image can be enhanced using the Brightness & Contrast sliders in the controls area of the Madena window. More powerful enhancement is obtained by switching the sliders to non-linear Bias & Gain functions by clicking on the "gamma" button or the icons above the sliders. Isodensity bands can be colorized. The effect of these basic image enhancements is also displayed in the image histogram display at the top of the controls area. The background color surrounding an image can be changed from gray to black in the "Preferences" dialog.
- For mammography users:
- If you are using Madena for mammmography analysis sessions you will be presented with a "Image Readers Name" dialog at startup. Enter the name of the person reading the images at this session. The special mammmography and session functions can be disabled in Madena Preferences, and are OFF by default.
- Under the File menu at the top of the screen select "Start Session As..." and give a name to this mammograph reading session. A status bar at the left bottom of the screen indicates the status of the session & its various states while the session is in progress.
- A Session is a working mode in Madena in which the user tends to view the mammograms, draw ROIs, open another image & append the statistics of the previous Image to the session data file (an Excel document). This mode uniquely allows the user to insert the statistics of the image into the Excel sheet.