
Image Fusion
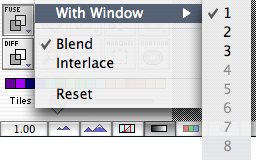 Images can be fused (or added, subtracted, etc...) between images A & B of the same window, or between the currently displayed image (i.e. A or B) of different windows. Madena supports up to 8 different windows. The default is to fuse within the same window. You can select a different window from the popup menu attached to the Fuse and Diff buttons.
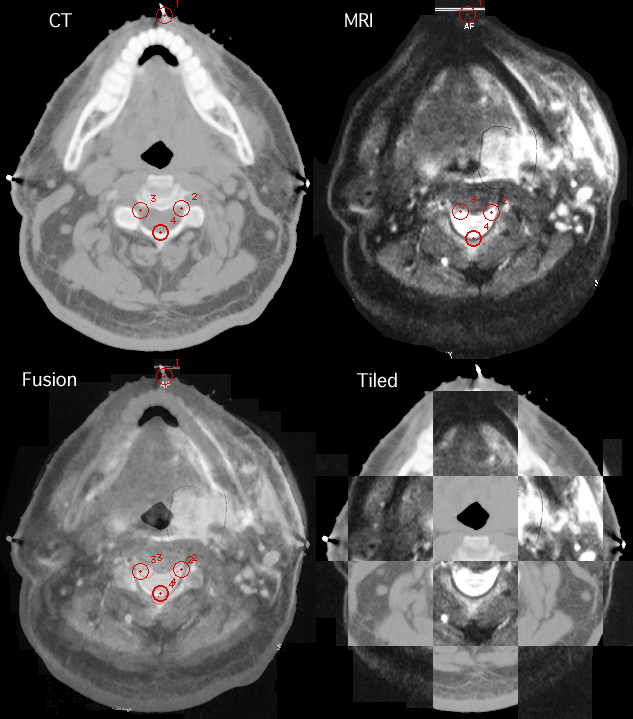
This is an example of CT and MRI fusion. An axial CT image from a DICOM file was opened and selected as image "A". An approximately equivalent axial MRI slice was obtained by photographing a film on a viewbox (using a Nikon megapixel digital camera) and saving the image as a JPEG (.jpg) file. The MR file was opened and selected as image "B". Equivalent points-of-interest (POI) were created on the two images and then the images fit by scaling and rotating and then fused. Also illustrated is the use of the tiling
 slider as an alternative method of merging images.
A step-by-step fusion tutorial using a chest X-ray and a gallium scan as examples follows.
In this tutorial we will fuse the sample chest x-ray and gallium scan that come with the Madena download. The same principles would apply to any other fusion, such as a CT and an MR image.
The chest and gallium .jpg files were obtained using a hand-held megapixel digital camera and simply taking a "snapshot" of the films as they hung on the backlit film viewer. The chest x-ray was 14"x17", the gallium scan about 3"x2". The .jpg files were transferred to a PowerMac running OS-X via USB and cropped in Photoshop 7.
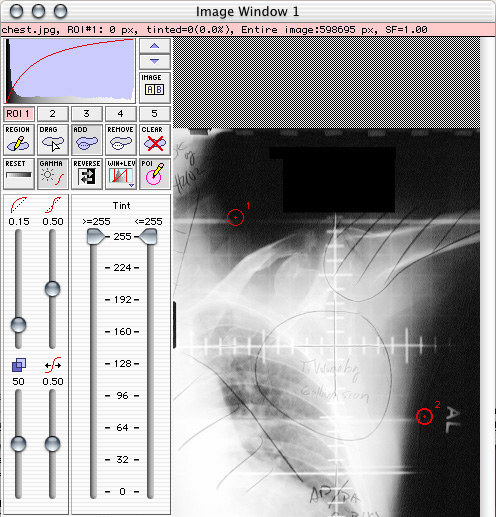
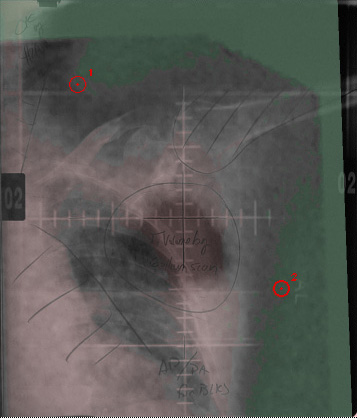
- Set the "Image AB" button to A and open the chest.jpg file as image #0. Use the bias and gain controls to visualize the tangential skin surface as much as possible. A physician had outlined the approximate location of the tumor on this film before it was digitized. Lets see how well he did.
- Enable Point-of-Interest (POI) drawing by clicking the "POI" button and place at least two (or more) points on image A at locations that you can identify in both images. POIs are placed by simply clicking on the image. When you have placed your points, click the POI button again to disable POI drawing. You can drag the POIs on the image by simply clicking on them. You can delete POIs by shift-clicking on them. The currently selected POI (#2 in the example below) is marked by a thicker circle. The "Points" menu provides additional options for the currently selected POI.
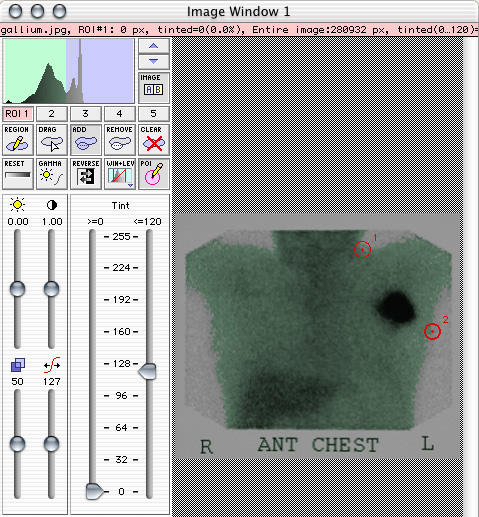
- Set the "Image AB" button to B and open the gallium.jpg file as image #1.
- On image B, mark the same number of points, and in the same order as you did on image A. In the gallium example below I have applied a green tint across the gray range 0..120 to help define the tangential skin surface. The large black spot is the tumor. Our objective is to find the equivalent location of the tumor on the chest x-ray.
- Switch back to image A (the chest image) by clicking the "Image AB" button.
- In this example I applied a pink tint to the chest image across the range 122..255. It can help with visualization if you apply contrasting tints to the images being fused.
- Click the "Fuse" button to enable image fusion. The images will fuse but the secondary image (ie image B in this case) is much smaller than the primary. Next, click the "Fit" button. The secondary image will be rotated and scaled to match its POIs to the equivalent POIs on the primary image. If you click the "Image B" button and then click the "Fit" button the fusion will work the opposite way, ie image A will be scaled and rotated to fit image B. (Shortcut: simply clicking the Fit button will automatically enable fusion for you.)
 The fusion slider controls the balance between the two source images. The "Tiles" slider divides the image into alternating tiles from the primary and secondary images. The "Diff" button provides some alternate fusion methods such as addition, subraction, multiplication and division of one image by the other. Control-click on the "Diff" button for a contextual menu.
- Manual control of the fusion rotation, translation and magnification factors is available in the Fusion dialog which is accessed from the "Image" menu.